Showing posts with label Xomega Framework. Show all posts

Xomega 8.11 for VS 2019 with Bootstrap and Syncfusion support

We are happy to announce the new Xomega.Net release 8.11, where your generated Blazor apps got an awesome facelift with the latest Bootstrap 5 framework, which provides responsive and customizable layout for the views and modern style for the Xomega Blazor components.

In addition to the default Blazor components, Xomega partnered with Syncfusion to allow you to generate Blazor apps using powerful and stylish Syncfusion Blazor components, including support for editable grids.

Among all the improvements, we also made it easier for you to localize the generated Blazor apps, and introduced a framework that allows you to control the state of the view actions from the reusable presentation layer code.

Keep reading to learn more about these new exciting features.

Bootstrap 5 responsive layout and styles

One of the major highlights of this release is the new modern responsive layout for the Xomega Blazor apps, as described below.

Labels on top

First thing that you will notice when generating Blazor apps with the new Xomega.Net release, is that the labels will be placed above the corresponding controls rather than to the left of them, as before. This makes it easier to align the fields, and can also help you keep the same layout for the right-to-left languages, such as Hebrew or Arabic.

In fact, the generated views no longer have separate controls for the labels, as the labels are just a part of the corresponding property-bound controls. The controls get the text for the label and the access key from the bound property, which will take them in turn from the localized resources, as you will see later. The access key gets automatically underscored in the label to give you a visual cue.
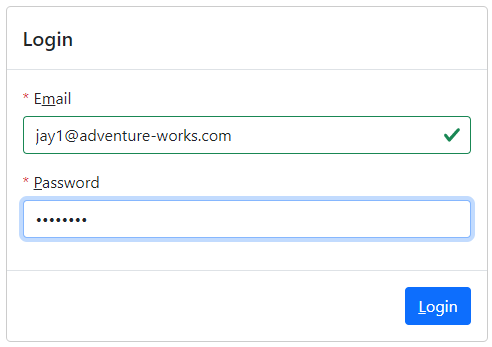
With no separate labels, the generated markup looks much cleaner, and allows you to easily hide both the control and the label when the bound property becomes invisible. The labels for controls bound to a required property will automatically get a red asterisk in front of them to help you communicate the required fields to the users.

From the screenshot above, you can also notice that the controls are now styled using the Bootstrap 5 library, including highlighting valid fields.

Sidebar criteria and menu

Now that the labels are on top of the controls, it made sense to change the layout of the search views to have the search criteria panel as a collapsible sidebar rather than as a panel on top of the results grid.

In the same vein, we made the main navigation menu as a collapsible sidebar, which allows you to show longer text in the menus, and provides more vertical space for the actual screen.

Bootstrap 5 styled controls

We have styled all Blazor controls that were available in the Xomega.Framework.Blazor package using the Bootstrap 5 library, and added some new components to that package that are used in the generated views.

The most notable suearch component is XGrid, which supports multi-column sorting and row selection. This, again, made the markup of the generated views much more readable and concise. Xomega model also allows you to customize the relative widths of the grid's columns either based on the logical types of the column's field or directly in the field configuration in the model.

Listed below are some other controls that have notable upgrades in this release.

Tri-state checkboxes

The XCheckBox component now supports indeterminate state to represent a null value of the bound property.

You can also display checkboxes as switches now, following the modern UI standards.

Field validation messages

Validation messages for the property-bound controls are now automatically displayed below the actual controls instead of being just a plain tooltip.
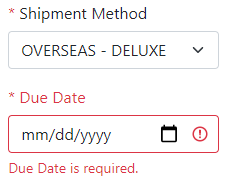
Bootstrap styling is also applied to invalid controls, highlighting them with the red color.

XDatePicker control for entering a date or date and time is based on the native HTML5 controls and calendars now instead of the jQuery UI.

Pick List

XPickList component for selecting multiple values from a list is now styled with Bootstrap and looks like this.

Multi-value auto-complete

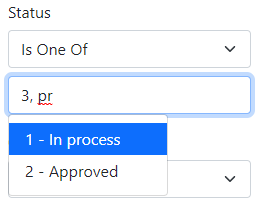
We implemented the XAutoComplete control entirely in Blazor without dependencies on third-party JavaScript libraries, with support of multi-valued properties, meaning that it will properly show suggestions for the value that is currently being edited.
Responsive layout

Bootstrap provides a great framework for building responsive views based on the size of your browser window. Yet, it falls short when it comes to dynamic views, such as master-details, where you can open or close a details panel for the selected record on the side.

As you open a number of such views dynamically, they will be allocated only a certain portion of the browser window, which is not necessarily known at design time. So your statically assigned layout classes would not work correctly, especially if you want to reuse the same view in multiple places, e.g. both in the full screen and embedded as a details side panel.

Xomega enhanced Bootstrap’s approach to responsive layout and provided a framework to dynamically calculate the layout classes for controls and their containing panels, so as to ensure the desired width of the fields as much as possible.

For example, here is a master-details screen, where the details panel is laid out in 4 columns when open on a wide screen.
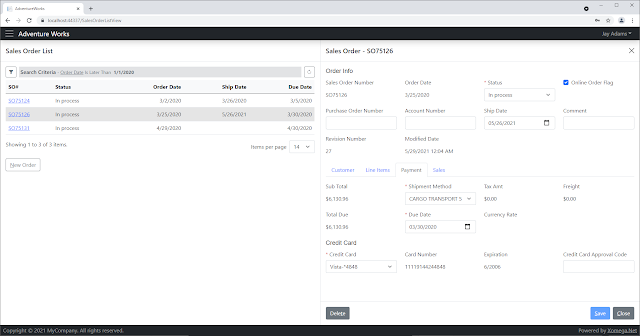
Notice that when you open the details panel on such a screen, Xomega will hide half of the columns in the results grid on the left, instead of jamming all the columns into half the space, or adding a horizontal scroll bar. Presumably, you will be able to see the details on the right panel, so the left-side grid will just need to show the key columns to identify the rows. If you close the details panel now, you will see all the columns in the results grid again.

However, if you try to shrink the width of the browser with the details panel open, you will notice that it will lay out the details into 3 columns first. At a certain threshold though, instead of shrinking the details further, it will completely hide the results grid, which will open up more space, and we'll make the details panel go back to 4 columns.

If you continue to shrink the browser, it will be changing the layout to use 3 columns, 2 columns, or 1 column for the smallest devices. Here is what this screen will look like on a smaller device, with the results grid hidden, and the details panel laid out in 3 columns.
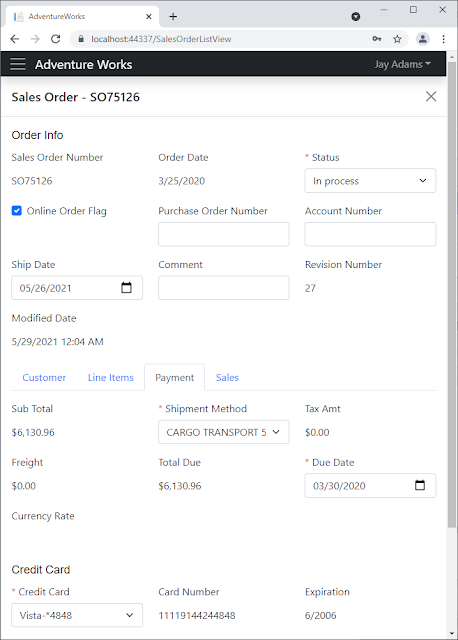
Customizable details views

Another great feature in the new Xomega release allows you to precisely customize the layout of individual details panels in the generated views. You can specify the desired maximum number of columns for the fields in each panel, set custom titles for the panels, and indicate which child data objects you want to lay out using tabs rather than plain panels. With tabs, you can also specify a custom title of each tab, and with panels, you can indicate how many columns they should be laid out within their parent object’s panel.

The screen below shows an example of a complex custom layout for a sales order details view. The direct fields of the sales order data object are laid out into up to 6 columns in a top panel with a custom title “Order Info”. The child objects are grouped into tabs right under the main panel.

The child data object Customer has in turn its main panel and the panels of its own child objects laid out in 2 columns, and has a custom title “Customer Info” for its main panel. The fields in its panels are laid out in 2 columns, except for the Billing and Shipping address panels, where they are laid out in 3 columns.

In the new version of Xomega model, you specify the custom layout configuration for each data object under its ui:display element - both for the layout of the main panel and for any of the child data objects.

For example, here is a configuration of the main SalesOrderObject for the above view.

<xfk:data-object class="SalesOrderObject" customize="true">
  <xfk:add-child name="customer" class="SalesOrderCustomerObject"/>
  <xfk:add-child name="detail" class="SalesOrderDetailList"/>
  <xfk:add-child name="payment" class="SalesOrderPaymentObject"/>
  <xfk:add-child name="sales" class="SalesOrderSalesObject"/>
  <ui:display>
	<ui:fields field-cols="6" panel-cols="1" title="Order Info">
	  <ui:field param="sales order id" hidden="true"/>
	</ui:fields>
	<ui:tabs>
	  <ui:tab child="detail" title="Line Items"/>
	</ui:tabs>
  </ui:display>
</xfk:data-object>

With this new flexible per-object configuration for responsive layout, the previous global model element ui:layout is no longer being used for Blazor views, and only remains to be used for older technologies, such as WebForms or WPF.

Action Buttons and Action Properties

Another awesome addition to the Xomega Framework is the ability to define Action Properties and bind them to Action buttons on your view.

Similar to data properties, Action properties maintain the Enabled and Visible state of the action, notify listeners of any changes in those states, and can be added either on specific data objects or directly on the view models, but they don’t carry any data.

This allows you to maintain the state of your actions in the platform-independent presentation layer, such as view models and data objects, and is especially valuable with the Blazor technology, which does not allow you to directly manipulate the state of controls.

Action Buttons bound to reusable Action Properties

Xomega Framework got a new Blazor Bootstrap-styled component XActionButton, which you can bind to your ActionProperty in order to drive its enabling and visible states, as well as to set its localized label.

Here is an example of the typical Delete, Save and Close action buttons for a Details view.

<XActionButton Action="@VM?.MainObj?.DeleteAction" OnClick="OnDeleteAsync"
               Class="me-auto"/>
<XActionButton Action="@VM?.MainObj?.SaveAction" OnClick="OnSaveAsync"
               IsPrimary="true"/>
<XActionButton Action="@VM?.CloseAction" OnClick="OnCloseAsync"/>

As you can see, they are bound to standard actions that are defined in the framework, and the framework implements the default logic for enabling or disabling these actions. For example, the Save action is enabled only when the main object has been modified, while the Delete action is disabled when creating a new object.

Note also that you don't have to provide the text for the action button, as it gets set from the label of the bound property, but you do need to implement the click handlers for the buttons.

Computed state for action buttons

The cool feature of Action properties, which they share with the regular data properties, is that you can set enabling or visibility conditions as Lambda expressions that may use the data object or its properties, and the framework will automatically maintain the action’s state based on this condition.

For example, the above mentioned enabling conditions for the Save and Delete actions would look as follows.

// add save action, and make it enabled only when the object
// is modified or doesn't track modifications
SaveAction = new ActionProperty(this, Messages.Action_Save);
Expression<Func<DataObject, bool>> saveEnabled = (obj) => obj != null &&
                                   (obj.Modified || !obj.TrackModifications);
SaveAction.SetComputedEnabled(saveEnabled, this);

// add delete action, and make it enabled only when the object is not new
DeleteAction = new ActionProperty(this, Messages.Action_Delete);
Expression<Func<DataObject, bool>> deleteEnabled = (obj) => obj != null && !obj.IsNew;
DeleteAction.SetComputedEnabled(deleteEnabled, this);

This feature will make it super easy for you to write the logic for the action states in your reusable presentation layer.

Localization of labels and titles

Xomega Framework already has support for localization of error messages both on the server and the client sides. In the new release we added support for the localization of other UI resources, such as property labels and titles for various panels and views.

Resource localization

Previously all labels and titles were output directly in the generated views using either explicit texts that you provide in the model, or ones derived from the names of the corresponding properties or other model elements.

The latest Xomega version includes a new generator that creates a resource file with all these labels and titles using specific key formats, which allows Xomega Framework to automatically use these resources for data properties’ labels and titles for child objects and views.

The generated Blazor views now use these resource keys to look up and output localized titles, and the updated Blazor controls use the localized label from the bound data property, which allows you to build fully localizable applications with little to no extra effort.

Resource customization

Xomega Framework provides a powerful CompositeResourceManager that lets you combine resources from an ordered list of multiple resource managers, and return resources from the first resource manager that has the specified key. So, for instance, if you include your custom resources before the standard framework resources, you will be able to override the text of the specific framework error messages or labels.

Similarly, you can override resources that are generated from the model for specific objects or properties in your custom resource file. For example, if you want the text for the standard Save button on the authentication form to say “Login” instead, you can override the resources for the corresponding data object as shown below.


Syncfusion Blazor components with editable grids

Another major feature in the new Xomega release is support for Syncfusion Blazor components, such as date/time controls, filterable dropdown lists and combo boxes, multi-select boxes etc, with all their bells and whistles.

This also includes powerful Syncfusion grids with baked-in searching and filtering, column choosing, resizing and reordering, as well as inline editing of grid rows.

When you create a new Xomega solution and select a project for shared Blazor components, you will have a choice between the standard Xomega Framework components and the ones that are based on Syncfusion framework, as shown below.
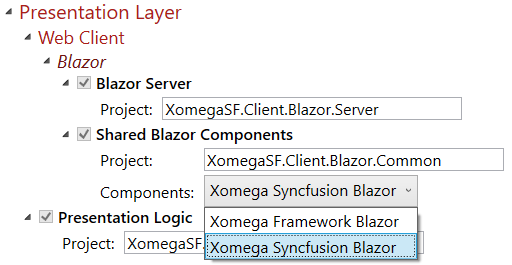
This will set up Syncfusion initialization code and will enable the Syncfusion Blazor Views generator. If you don't have any Syncfusion-specific UI customizations, you will be able to easily switch between the Xomega standard and Syncfusion components to see the difference.

Syncfusion Blazor components

Here is an example of the generated master-details Sales Order list and details forms using Syncfusion components with bootstrap 4 style.

While it may look very similar to the standard Xomega Blazor components, you can notice that it uses the Syncfusion’s MultiSelect control for selecting multiple sales reasons, since the Pick List control is not available in the Syncfusion framework.

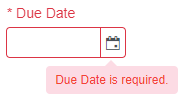
Also the validation message for invalid fields is displayed as a tooltip on invalid controls rather than under the field, in order to be consistent with the grid editing, as shown below.
Syncfusion editable grids

We have enhanced Xomega Framework to support fully-featured inline grid row editing using Syncfusion’s grid. You can still write the platform independent UI logic in your presentation layer data objects, and just bind them to an editable grid.

For example, here is a screenshot of our updated sample, where we enabled editing of the line items of a sales order directly in the grid.

The list of products is automatically displayed as a dropdown, and the items in the Special Offer list depend on the selected product. So does the price, which is not editable and grayed out, just as other calculated fields like the discount (which is based on the special offer) and the total amount.

If you try to update the row with invalid fields, the validation errors will be shown under those fields. All this presentation logic is defined in reusable list data objects and data properties, which you can test independently, and use with various UI technologies.

Conclusion

As you have seen from the above, the new Xomega release introduces a ton of new cool features for generated Blazor apps - from upgrading to Bootstrap styles and layouts, to supporting powerful Syncfusion Blazor components.

This will allow you to generate and build modern and complete apps in no time with little to no coding. We are planning to keep improving Xomega platform and its documentation to minimize the learning curve for you, but feel free to download and check out the new release now, and let us know should you have any questions or issues.
Computed properties in Xomega Framework

In this article you will get familiar with Xomega Framework, and will learn how to write testable and reusable multi-platform presentation logic for your applications. Specifically, you will learn how to implement computed properties using both the traditional MVVM approach and a new, simple but powerful expressions-based approach.

What is Xomega Framework

For those of you who are not familiar with the Xomega Framework, it's a powerful framework for building web and desktop applications in .NET using MVVM pattern with clean layer separation. It allows you to easily write most of your presentation logic in a platform-independent way, which not only makes it extremely testable, but also allows you to use (and reuse) it with completely different UI layers, such as WPF and Blazor, or even with the older WebForms framework.


This way you can share your presentation logic between different UI technologies for web, desktop or even mobile applications, and then easily upgrade the UI layer if a new UI framework becomes available, thus future-proofing your application.


Let's take a look at some of the major parts of the Xomega Framework.

Data Objects

Data objects represent a part of the View Model in the MVVM pattern that contains observable data, which the View can be bound to. Data objects consist of special data properties, as well as other child data objects.


A special type of data object is a list object, where the data is stored in data rows, and the data properties represent columns in a table.

Data Properties

Unlike regular object properties, Xomega Framework data properties encapsulate not only the data value or multiple values, but also dynamic property metadata, such as editability, visibility, security access, whether or not the property is required, a list of possible values, modification state, as well as formatting, validation and conversion rules for the values.


The framework has an extensible hierarchy of data properties, which represents various data types with their specific conversion and formatting rules.


Here is what a data object and some of its properties will look like for the SalesOrderDetail table from the AdventureWorks database.

public class SalesOrderDetailObject : DataObject
{
    public EnumIntProperty ProductIdProperty { get; private set; }
    public SmallIntegerProperty OrderQtyProperty { get; private set; }
    public EnumIntProperty SpecialOfferIdProperty { get; private set; }
    public MoneyProperty UnitPriceProperty { get; private set; }
    public PercentFractionProperty UnitPriceDiscountProperty { get; private set; }
    public MoneyProperty LineTotalProperty { get; private set; }
}

Property Change Events

Similar to the other classic MVVM frameworks, Xomega data properties allow you to subscribe to property change events. However, unlike notifying about only the value changes, like the INotifyPropertyChange interface, data properties can also notify you about changes in their metadata as well, such as when the property becomes editable or required, or when the list of possible values for the property has changed.


A single property change event can be fired for any change in the data property’s value or any of its metadata, and also for any combination of such changes. So a single event can notify you about changes in all property attributes at once, which would allow listeners, such as property-bound controls, to update all of its state at the same time.


It also means that when listening for just property value changes, for example, you need to check if the property change includes the value change to avoid unnecessary execution of your callback.

Binding to UI controls

One of the primary usage of the property change events is support for binding properties to UI controls. This would automatically include binding control’s state to the property metadata, which makes this binding extremely simple and easy to use.


Once a UI control is bound to the property, you can set the property to be editable, required or invisible, and the changes will be reflected in the UI control automatically,  without you having to bind those things separately.


Depending on the UI framework that you use, there could be two different ways to bind UI controls to data properties, as described below.

Control property bindings

With UI frameworks that allow you to associate additional attributes with the controls, such as attached properties in WPF, or custom attributes in WebForms controls, you can set the data property name on such controls, and have those controls bound to the data property using separate bindings.


This method allows you to bind any custom or third-party control that is derived from common UI controls to your data properties. Xomega Framework provides an extensible hierarchy of property bindings for both WPF and WebForms controls.


Here is an example of a WPF ComboBox control that is bound to the ProductId property using a static constant for the property name to provide compiler safety.

<ComboBox xmlns:xom="clr-namespace:Xomega.Framework;assembly=Xomega.Framework.Wpf"
          xom:Property.Label="{Binding ElementName=lblProductId}"
          xom:Property.Name="{x:Static o:SalesOrderDetailObject.ProductId}" />

The same control in WebForms would look as follows.

<asp:DropDownList LabelID="lblProductId" Property="<%# SalesOrderDetailObject.ProductId %>"
                  AutoPostBack="true" runat="server" />

Property bound controls

In other UI frameworks where using separate property bindings is not supported or problematic, you can develop and use custom UI controls that can be bound to Xomega data properties.


Xomega Framework provides a set of common Blazor components that you can bind directly to your data properties.


For example, a view with Blazor components that is bound directly to the properties of our SalesOrderDetailObject would look as follows.

<div>
    <XLabel Property="@VM?.MainObj?.ProductIdProperty" Text="Product:" />
    <XSelect Property="@VM?.MainObj?.ProductIdProperty" />
</div>
<div>
    <XLabel Property="@VM?.MainObj?.OrderQtyProperty" Text="Order Qty:" />
    <XInputText Property="@VM?.MainObj?.OrderQtyProperty" />
</div>
<div>
    <XLabel Property="@VM?.MainObj?.SpecialOfferIdProperty" Text="Special Offer:" />
    <XSelect Property="@VM?.MainObj?.SpecialOfferIdProperty" />
</div>
<div>
    <XLabel Property="@VM?.MainObj?.UnitPriceProperty" Text="Unit Price:" />
    <XDataLabel Property="@VM?.MainObj?.UnitPriceProperty" />
</div>
<div>
    <XLabel Property="@VM?.MainObj?.UnitPriceDiscountProperty" Text="Unit Price Discount:" />
    <XDataLabel Property="@VM?.MainObj?.UnitPriceDiscountProperty" />
</div>
<div>
    <XLabel Property="@VM?.MainObj?.LineTotalProperty" Text="Line Total:" />
    <XDataLabel Property="@VM?.MainObj?.LineTotalProperty" />
</div>
  
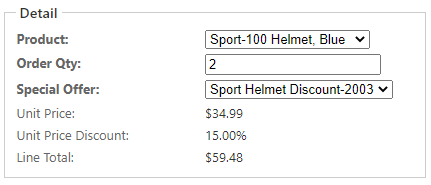
When you run the application and open that view, it will look as shown below.


We used appropriate edit controls, such as dropdown lists and a textbox, for the first three fields that the user can enter. The last three fields are calculated based on the selected values of the first three fields, and cannot be entered directly by the user. So we used a display-only XDataLabel component for them, which is also bound to our properties.


Note also that the properties are automatically displayed using proper formatting, such as currency or percent.

Computed Properties

As you saw earlier, calculated display-only fields on a view are bound to data properties, where the value is not entered by the user, but is rather computed from the values of other data properties.


Specifically, the Unit Price is calculated based on the selected Product, and the Discount is calculated based on the selected Special Offer. Those selected values are represented by a Xomega Framework class Header, which stores an internal Id, the display text, and an arbitrary number of named attributes. The values of the unit price and discount are stored as special attributes of those selections, as you will see below.


The Line Total property is computed based on the specified quantity and the calculated unit price and discount. Let’s take a look at how to implement such computed properties using Xomega Framework.

Computed properties via events

The most straightforward way to implement a computed property is to add property change listeners to any other data properties that it depends upon, and then recalculate the computed value whenever the value of any of those data properties changes.


To implement the Unit Price we can override the OnInitialized method on our data object, and add a listener to the ProductIdProperty, which will update the UnitPriceProperty as follows.

protected override void OnInitialized()
{
    base.OnInitialized();
 
    ProductIdProperty.Change += (sender, e) =>
    {
        if (e.Change.IncludesValue())
        {
            UnitPriceProperty.SetValue(ProductIdProperty.IsNull() ? null : 
                                       ProductIdProperty.Value["list price"]);
        }
    };
}

Note how we check if the change includes value, since data property changes may be fired for other metadata changes.


To implement the computed property for the Unit Price Discount, we will add a similar listener to the SpecialOfferIdProperty, and will set the value of the discount from an attribute of the selected special offer as follows.

SpecialOfferIdProperty.Change += (sender, e) =>
{
	if (e.Change.IncludesValue())
	{
		UnitPriceDiscountProperty.SetValue(SpecialOfferIdProperty.IsNull() ? null : 
                                          SpecialOfferIdProperty.Value["discount"]);

		UnitPriceDiscountProperty.Visible = !UnitPriceDiscountProperty.IsNull() &&
                                                     UnitPriceDiscountProperty.Value > 0;
	}
};

In the same listener we update the visibility of the discount property in order to hide the field if there is no discount.


Finally, to implement the computed Line Total property, we will first add two helper functions: GetLineTotal that calculates the line total for supplied nullable values, and the UpdateLineTotal property change listener, which uses that function to set the value of the LineTotalPoperty from the values of the other properties, as follows.

private decimal GetLineTotal(decimal? price, decimal? discount, int? qty) =>
    (price ?? 0) * (1 - (discount ?? 0)) * (qty ?? 0);
 
private void UpdateLineTotal(object sender, PropertyChangeEventArgs e)
{
    if (e.Change.IncludesValue())
    {
        LineTotalProperty.SetValue(GetLineTotal(UnitPriceProperty.Value,
            UnitPriceDiscountProperty.Value, OrderQtyProperty.Value));
    }
}

Now we just need to update the OnInitialzied method, and add the UpdateLineTotal as a listener to all the properties, whose values it depends on, as shown below.

    ProductIdProperty.Change += UpdateLineTotal;
    SpecialOfferIdProperty.Change += UpdateLineTotal;
    OrderQtyProperty.Change += UpdateLineTotal;

Remember that all this presentation logic is contained entirely in the data object, and does not depend on the actual UI layer, which means that you can reuse it with any UI framework.

Computed properties via expressions

While implementing computed properties via events, as described earlier, could be the most straightforward way, it’s not the simplest or the most natural one. Adding all these property listeners that recalculate values of other properties can get very tedious. And even after you add them all, you will have a hard time understanding how each computed property is calculated. You also need to be very careful when changing any of the calculations to make sure you add new listeners for any additional properties that computed value uses, and remove the listeners for the properties that it no longer depends on.


A more natural way to define computed properties is to just express the formula for calculating the value, and let the system update the computed value whenever the other properties change. This would be similar to defining such formulas for calculated cells in an Excel spreadsheet.


In order to support this, Xomega Framework added a new feature, where you can define an expression that takes any number of data objects or data properties and returns the computed value as an object. Then you call the SetComputedValue method on the target computed property, and pass that expression to it along with references to the actual objects for the expression’s arguments.


With this approach, setting up the computed UnitPriceProperty with an expression that takes the current data object will be very easy and succinct, as shown below.

protected override void OnInitialized()
{
    base.OnInitialized();
 
    // computed property using the entire object
    Expression<Func<SalesOrderDetailObject, object>> xPrice = sod =>
        sod.ProductIdProperty.IsNull(null) ? null : sod.ProductIdProperty.Value["list price"];
    UnitPriceProperty.SetComputedValue(xPrice, this);
}

You can make it even more succinct and easier to read, if you make the expression based on specific data properties rather than a data object, as shown in the following snippet, which sets up the price discount based on the special offer.

    // computed property using individual property
    Expression<Func<EnumProperty, object>> xDiscount = spOf =>
        spOf.IsNull(null) ? null : spOf.Value["discount"];
    UnitPriceDiscountProperty.SetComputedValue(xDiscount, SpecialOfferIdProperty);

If you want to set up computed metadata, such as visibility or editability, based on the values or metadata of other properties, then you can use a similar expression that returns a bool. For example, the following code shows how to make the price discount visible only if its own value (the discount) is greater than zero.

    // computed visible attribute based on discount value
    Expression<Func<PercentFractionProperty, bool>> xVisible = dp =>
        !dp.IsNull(null) && dp.Value > 0;
    UnitPriceDiscountProperty.SetComputedVisible(xVisible, UnitPriceDiscountProperty);

Finally, to configure more complex computed properties, such as our LineTotalProperty, we can make the expression use our helper function GetLineTotal, and just pass it the values of individual data properties, as follows.

    // computed total using a helper function
    Expression<Func<SalesOrderDetailObject, decimal>> xLineTotal = sod =>
        GetLineTotal(sod.UnitPriceProperty.Value,
                     sod.UnitPriceDiscountProperty.Value,
                     sod.OrderQtyProperty.Value);
    LineTotalProperty.SetComputedValue(xLineTotal, this);

Using helper functions like this will allow you to keep the expressions easy to read and implement, since you will no longer be limited by the expression syntax in the helper functions, and can use the full gamut of C# features there.

Conclusion

In this article you have learned the basic principles of Xomega Framework that uses observable data properties and data objects to implement reusable presentation logic of your application independent of the UI framework being used.


You saw how the property change events can be used both for binding data properties to UI controls, and to implement computed properties.


And lastly, you learned how the new Xomega Framework features allow you to easily set up computed properties using clear and concise expressions for the calculated value, without the hassle of managing any property listeners.


Please feel free to try out these new cool features of the Xomega Framework, and let us know how you like them.


Introducing support for Flexible Operators

In release 7.8 Xomega has tremendously improved support for operators that are used to build search forms and LINQ queries.

Thanks to the framework support, using operators to build LINQ queries takes just a single line of code now. The framework comes loaded with standard operators for common data types, as well as dynamic operators for ranges of (relative) dates and numbers. Plus, it allows you to implement and plug in your own operators or override the behavior of any of the built-in operators.

Read on to learn more about these powerful features.


Framework to support operators for building queries.

While Xomega supported operators for query operations before, it was using a predefined list of operators, and each operator was handled explicitly for each criteria in the generated service, which resulted in a rather bloated and inflexible generated class.

With addition of the operators support to the Xomega Framework, including in the BaseService class, handling any criteria with operators takes just one line in the service now. Not only does it make the generated code much more cleaner, but it also helps writing custom code for non-standard criteria so much easier.

Standard operators for common data types.

Xomega Framework provides implementation for most of the standard operators on the common data types, such as Is Null, Equals To, Less Than and Greater Than, Between etc., including the corresponding inverse operators.

You can also develop and register your own implementation of any custom operator, or even override implementation of any of the standards operators.

Dynamic operators for date ranges using relative dates.

In addition to the standard predefined operators, Xomega Framework supports dynamic operators for date ranges. For each upper/lower bound of the range you can use either an absolute date or a relative date, such as ‘ct’ for the current time, ‘bo(s/m/h/d/w/M/y)’ for the beginning of second, minute, hour, day, week, month or year respectively, or the ‘eo(s/m/h/d/w/M/y)’ for the end of the same period.

You can further adjust it by adding or subtracting a certain number of periods, e.g. -60d to subtract 60 days, and also indicate whether you want to include or exclude the bound by using either square brackets or parentheses respectively.

For example, Xomega supplies the following standard dynamic range operators for relative  dates, but you are free to define your own operators like that in your Xomega model.
      <item name="Today" value="[bod,eod)"/>
      <item name="This Week" value="[bow,eow)"/>
      <item name="This Month" value="[boM,eoM)"/>
      <item name="This Year" value="[boy,eoy)"/>
      <item name="Last 30 Days" value="[bod-30d,ct]"/>

Dynamic operators for number ranges.

Similar to the date ranges, Xomega Framework also supports dynamic operators for numeric ranges. So, for certain numeric fields you may want to let the user select criteria for some  predefined ranges instead of, or in addition to, manually supplying the From and To values.

For example, to filter something by price you can define low, medium, and high price ranges,  which you can call  Budget, Average and Luxury respectively, as follows.
      <item name="Budget" value="[0,100)"/>
      <item name="Average" value="[100,1000)"/>
      <item name="Luxury" value="[1000,)"/>

These operators do not require additional values, and are more convenient for the user. If none of your operators for a certain field require additional values, then you can also make the operator parameter multi-value in the Xomega model, which will allow the user to filter by multiple ranges at the same time.

New Service Validations in Xomega 7.8

Xomega now supports more easy and powerful validation on the server side, which ties into the Xomega error reporting framework.

This includes service request validations using Data Annotations, as well as user-friendly errors for common constraint violations as follows.


Improved validation of entity existence.

The services project template includes a convenient extension method to find entities by the key(s) and report an immediate 404 error if the entity is not found. This method is used by the generated services, and can be used by the custom code, which makes the code much cleaner.

Improved validation of foreign keys.

Similar to the entity existence validation, there is now a simple method to validate if the supplied foreign key(s) are valid. Unlike the previous validation though, it reports a regular error, which allows to gather all applicable errors before running the business logic and report them in a user-friendly fashion, as opposed to the DB constraint violation errors.

Validation of duplicate primary keys.

Another added validation that is also used by the generated services allows you to validate if the entity with the given key(s) already exists when creating a new domain object, which also reports a user-friendly error instead of a DB primary key violation.

Request validation of required fields, maximum length and enumerations.

The UI forms generated by Xomega already take care of validating user input in terms of required fields, maximum length etc. and make sure the values for enumerated fields are selected from the associated list.

However, the best practices for multi-tier architectures call for the business services that are exposed via REST or WCF to also perform such validations, without relying solely on the client for those. While some of these checks would be done by the database as well, Xomega now validates request values upfront, and reports user-friendly errors before running the business logic.

Improved Error Reporting in Xomega 7.8

Xomega has made some significant changes in the way errors and other messages are reported from the business services and displayed to the user.

This includes ability to return not only errors, but also warnings and info messages from any service operation in a standardized way, and handle them consistently by displaying them in a configurable closable panel as described below.


Ability to return (warning/info) messages from services along with the results.

Validation errors, as well as other types of errors from business services are returned to the client using standard Xomega Framework structures for error messages, which allows handling them consistently on the client side. However, if a service operation succeeds and has no errors, but still needs to report some warning or info messages to the client, potentially also with the actual results of the operation, there was no standardized way to report those, and you’d have to custom design each such operation to return the necessary messages.

With the new release, each Xomega service operation now returns a standardized list of errors, warnings and/or info messages in addition to the actual results of the operation, where applicable. This way any service operation can easily report additional warning or info messages, which would be displayed to the user, without having to customize its output structure.

For example, an update service operation may report some warnings to the user based on business validations. Or a service may report cross-cutting messages informing the users about a scheduled downtime or about a newer version of the service available.

Reported messages and errors displayed consistently in a closable panel.

Previously the validation and service errors were displayed inconsistently across the UI clients as a simple list either on the screen or in a popup dialog for WPF clients. The errors could be closed also inconsistently - by closing the dialog in WPF, after any postback in WebForms, and after re-running the validations and the service operation in the SPA client.

In the current release, all Xomega messages from client-side validation or service operations are consistently displayed in a closable panel on the same view that triggered the operation as shown below.


This way the users can have the messages up while they are addressing the errors on the screen, or they can just close it if they don’t need it anymore.

Configuration of the messages panel layout.

In addition to the messages being in a closable panel now, you can now configure whether you want to display it at the top or the bottom of the form for both the search and details screen. This is done as part of the view layout configuration in the model, which you can configure in one place, or override for each individual view as needed.

Globalization Support in Xomega 7.8

Xomega release 7.8 has added support for globalization of the business services to allow translating messages to the language of the request and overriding framework’s default messages, and uses the current request culture for date operations as follows.

Error messages read from resources for globalization.

The text for error messages from the Xomega Framework as well as server-side validations is now read from the resource files, allowing to provide such texts in multiple languages, and return localized error messages in the language of the service request.


Ability to override and translate text for message from referenced libraries.

The default implementation of the ResourceManager in the .Net framework allows reading the text only from a specific resource or its satellite localizations. As a result, when such resources come from a third party library, such as the Xomega Framework itself, the application has no way of customizing the text of the messages used by that library.

With addition of the CompositeResourceManager in the Xomega Framework, you will be able to not only translate the framework’s messages into another language, but also override the default (English) text for some of those messages.

Use of request culture for date operations.

In addition to translation of the error messages, the services can use the current request's culture for date operations. For example, when filtering dates for the current week, Xomega Framework will use the current culture to determine the first day of the week, i.e. Sunday or Monday.

Xomega Architecture for ASP.NET Applications

Classic ASP.NET web applications mostly run on the web server, which processes HTTP requests from the client browser and then either serves static resources, such as images, JavaScript or CSS files, or generates and returns dynamic resources, which are mainly HTML that may be mixed with dynamically generated JavaScript code and CSS classes. That HTML is then rendered on the client browser, which also executes any scripts within the HTML. Those scripts may in turn issue asynchronous AJAX requests to the server, which would return the response either as HTML snippets or in some other format.

Most of the UI logic is implemented on the web server in the middle tier along with the business logic for the application. The middle tier can access the database or any other external services to read or update the data.

The following diagram demonstrates how the ASP.NET web application architecture is implemented using the default Xomega solution template.


Presentation Tier

The presentation tier that runs in the browser consists primarily in rendering the HTML response from the web server, executing any scripts contained therein and applying the stylesheets. The scripts typically provide client side validations of the user input, but may do some basic DOM manipulation or issue additional server side AJAX requests to call a web service on the server side or make a partial page request.

Middle Tier

Middle tier, which runs in the web server, has a layered structure with a Business Logic Layer, Service Layer and the Web Forms UI layer, which follows the Model-View-View Model (MVVM) development paradigm and in turn consists of Views, View Models and Code behind. All static resources such as HTML templates, JavaScript files, CSS and images are served by a standard Web Server like IIS.

The Views that represent the visual panels and controls get bound to the corresponding View Models that store the actual Model data for the view, the state and meta-data for that model data, such as whether this data is editable or required or the list of values it can accept, and also provide any functions that validate the data on the UI side or convert the data from one format to another, e.g. between the UI format and the internal values.

The actual UI logic is encapsulated in the Code behind that runs when the client sends GET or POST requests to the corresponding ASPX page (View) and acts as a Controller in the classic MVC approach. It instantiates a new View Model or retrieves the cached one from the current session and then binds it to the current View using Xomega Framework, which provides two-way binding. This means that whenever the user changes anything on the screen it will be automatically propagated to the model and vice versa – when the application changes the view model, it will be automatically reflected in the view that is bound to it.

The view models are implemented using Xomega Framework data object classes, which significantly simplifies both defining such data objects and its properties by providing all the plumbing for them such as validations, data conversion and formatting, lists of values and so forth, as well as binding view elements to those properties by implementing custom web bindings. These Xomega data objects may implement significant part of the UI behavior without any dependency on the web application, which means that you can reuse them in other types of clients such as desktop or Silverlight by simply binding them to a different XAML view.

Moreover, Xomega Framework data objects for the application are mostly automatically generated from the Xomega service model operations described in this document with ability to extend them in separate classes, so that the data objects could be regenerated any time the service model changes. The standard views with code behind for search and details pages can also be initially generated from the Xomega service model, which can help boost the development productivity as the developers could start with an 80% or so complete working view and then update it and add the remaining 20% of functionality.

The page’s Code behind handles any user actions on the server side and calls the services provided by the Service Layer to read the data for the data objects and save the user updates from the data objects into the database.

All service interfaces and structures for data contracts (also known as Data Transfer Objects or DTO) in the Service Layer are generated automatically from the Xomega service model. This allows providing alternative mock implementations of the services for testing purposes. The service implementation classes can also be initially generated from the Xomega service model, which speeds up the development process, but the developers need to implement any remaining service logic manually from that point on.

The service implementation classes use Entity Framework (EF) and LINQ to read the data from the database and persist the changes to the data. The Entity Data Model (EDM) is automatically generated from the Xomega object model and the classes for the corresponding entities are in turn generated from the EDM either by the built-in Visual Studio generator or by a T4 text template depending on whether you use the legacy Object Context or the latest DB context.

The generated entity classes can be extended to provide data validation, propagation and recalculation, which form the Business Logic Layer. This allows for all this entity functionality to be reused across multiple services and ensure data validity and integrity regardless of which service is updating this data. Business Logic Layer may also include a number of background tasks and services that run in the middle tier either on a scheduled basis or in response to external events.

Data Tier

The data tier (also called persistence tier) is implemented as a relational SQL server database that is hosted in its own database server. Most of the communication with the database from the middle tier can be handled automatically by the Entity Framework and LINQ queries. However, the middle tier may call the database directly to invoke a stored procedure or run a SQL query.

The SQL server database may also have its own internal logic implemented using T-SQL in the stored procedures or triggers that runs directly in the database.

Xomega Architecture for Silverlight Web Applications

Silverlight web applications are downloaded from the web server and executed inside the web browser by the Silverlight plug-in, which provides a restricted version of the .Net framework with limited access to the file system, threading model and other system resources.

In order to read data from the server and save changes Silverlight client makes WCF service calls using any WCF bindings that are supported by Silverlight. Typically the WCF services are hosted on the same web server and the client uses HTTP bindings and XML (SOAP) format.

The following diagram demonstrates how the Silverlight web application architecture is implemented using the default Xomega solution template.

Presentation Tier

Presentation tier, which runs in the browser, follows the Model-View-View Model (MVVM) development paradigms where the Views that represent the visual panels and controls get bound to the corresponding View Models that store the actual Model data for the view, the state and meta-data for that model data, such as whether this data is editable or required or the list of values it can accept, and also provide any functions that validate the data on the client side or convert the data from one format to another, e.g. between the UI format and the internal values.

The actual presentation tier logic is encapsulated in the Code behind that runs when the client navigates to the corresponding XAML view. It instantiates a new View Model and then binds it to the current View using Xomega Framework, which provides two-way binding. This means that whenever the user changes anything on the screen it will be automatically propagated to the model and vice versa – when the application changes the view model, it will be automatically reflected in the view that is bound to it. The code behind reads any data from the middle tier into the View Model, and also handles UI events and updates the middle tier as a result.

The view models are implemented using Xomega Framework data object classes, which significantly simplifies both defining such data objects and its properties by providing all the plumbing for them such as validations, data conversion and formatting, lists of values and so forth, as well as binding view elements to those properties by implementing custom WPF bindings. These Xomega data objects may implement significant part of the UI behavior without any dependency on the Silverlight application, which means that you can reuse them in other types of clients such as desktop or ASP.NET by simply binding them to a different XAML or ASPX view respectively.

Moreover, Xomega Framework data objects for the application are mostly automatically generated from the Xomega service model operations described in this document with ability to extend them in separate classes, so that the data objects could be regenerated any time the service model changes. The standard views with code behind for search and details pages can also be initially generated from the Xomega service model, which can help boost the development productivity as the developers could start with an 80% or so complete working view and then update it and add the remaining 20% of functionality.

Middle Tier

The middle tier, which runs on the web-based application server, also has a layered structure with Business Logic Layer, Service Layer and the WCF Web Services, which are built on top of the service layer to expose these services over the web.

Static resources such as HTML pages, JavaScript files, CSS and images, as well as the actual Silverlight application package XAP, are served by a standard Web Server like IIS.

Service interfaces and data contracts (also known as Data Transfer Objects or DTO) in the Service Layer are generated automatically from the Xomega service model and decorated with WCF attributes to enable exposing service contracts as Web Services. The service and endpoint configurations as well as any IIS service host files are also generated from the Xomega model.

The service implementation classes can also be initially generated from the Xomega service model, which speeds up the development process, but the developers need to implement any remaining service logic manually from that point on.

The service implementation classes use Entity Framework (EF) and LINQ to read the data from the database and persist the changes to the data. The Entity Data Model (EDM) is automatically generated from the Xomega object model and the classes for the corresponding entities are in turn generated from the EDM either by the built-in Visual Studio generator or by a T4 text template depending on whether you use the legacy Object Context or the latest DB context.

The generated entity classes can be extended to provide data validation, propagation and recalculation, which form the Business Logic Layer. This allows for all this entity functionality to be reused across multiple services and ensure data validity and integrity regardless of which service is updating this data. Business Logic Layer may also include a number of background tasks and services that run in the middle tier either on a scheduled basis or in response to external events.

Data Tier

The data tier (also called persistence tier) is implemented as a relational SQL server database that is hosted in its own database server. Most of the communication with the database from the middle tier can be handled automatically by the Entity Framework and LINQ queries. However, the middle tier may call the database directly to invoke a stored procedure or run a SQL query.

The SQL server database may also have its own internal logic implemented using T-SQL in the stored procedures or triggers that runs directly in the database
.

Xomega Architecture for Client/Server Desktop Applications

Client/Server desktop application represents a simpler version of multi-tier desktop application architecture where the business logic resides on the presentation tier, which communicates directly with the database.

This architecture is more appropriate for standalone applications that do not require any direct communications with external systems or any background services that have to run regardless of whether the desktop application is running for any users.

The following diagram demonstrates how the client-server desktop application architecture is implemented using the default Xomega solution template.


Presentation Tier

Presentation tier, which runs as a windows application on the user’s machine, has a layered architecture where the UI layer interacts with the Service Layer wrapped around the Business Logic Layer.

The UI layer follows the Model-View-View Model (MVVM) development paradigms where the Views that represent the visual forms and controls defined in XAML get bound to the corresponding View Models that store the actual Model data for the view, the state and meta-data for that model data, such as whether this data is editable or required or the list of values it can accept, and also provide any functions that validate the data on the client side or convert the data from one format to another, e.g. between the UI format and the internal values.

The actual presentation tier logic is encapsulated in the Code behind that runs when the user opens the corresponding WPF form. It instantiates a new View Model and then binds it to the current View using Xomega Framework, which provides two-way binding. This means that whenever the user changes anything on the screen it will be automatically propagated to the model and vice versa – when the application changes the view model, it will be automatically reflected in the view that is bound to it. The code behind reads any data from the Service Layer into the View Model, and also handles UI events and updates the middle tier as a result.

The view models are implemented using Xomega Framework data object classes, which significantly simplifies both defining such data objects and its properties by providing all the plumbing for them such as validations, data conversion and formatting, lists of values and so forth, as well as binding view elements to those properties by implementing custom WPF bindings. These Xomega data objects may implement significant part of the UI behavior without any dependency on the WPF application, which means that you can reuse them in other types of clients such as Silverlight or ASP.NET by simply binding them to a different XAML or ASPX view respectively.

Moreover, Xomega Framework data objects for the application are mostly automatically generated from the Xomega service model operations described in this document with ability to extend them in separate classes, so that the data objects could be regenerated any time the service model changes. The standard search and details forms with code behind can also be initially generated from the Xomega service model, which can help boost the development productivity as the developers could start with an 80% or so complete working form and then update it and add the remaining 20% of functionality. To make the generated forms calls the service layer directly the Service Invocation parameter of the generator should be set to “Direct”.

Service interfaces and data contracts (also known as Data Transfer Objects or DTO) in the Service Layer are generated automatically from the Xomega service model. This allows providing alternative mock implementations of the services for testing purposes.

The service implementation classes can also be initially generated from the Xomega service model, which speeds up the development process, but the developers need to implement any remaining service logic manually from that point on.

The service implementation classes use Entity Framework (EF) and LINQ to read the data from the database and persist the changes to the data. The Entity Data Model (EDM) is automatically generated from the Xomega object model and the classes for the corresponding entities are in turn generated from the EDM either by the built-in Visual Studio generator or by a T4 text template depending on whether you use the legacy Object Context or the latest DB context.

The generated entity classes can be extended to provide data validation, propagation and recalculation, which form the Business Logic Layer. This allows for all this entity functionality to be reused across multiple services and ensure data validity and integrity regardless of which service is updating this data.

Data Tier

The data tier (also called persistence tier) is implemented as a relational SQL server database that is hosted in its own database server. Most of the communication with the database from the middle tier can be handled automatically by the Entity Framework and LINQ queries. However, the presentation tier may call the database directly to invoke a stored procedure or run a SQL query.

The SQL server database may also have its own internal logic implemented using T-SQL in the stored procedures or triggers that runs directly in the database.

Xomega Architecture for Multi-Tier Desktop Applications

Multi-tier desktop applications are typically used in internal enterprise systems that are not exposed over the web. The presentation tier runs on the user's machine and connects to the middle tier to read and update the enterprise data. The middle tier performs any validation and propagation logic to ensure data validity and consistency. It may service multiple clients and possibly provide different types of interfaces for different clients.

The following diagram demonstrates how the multi-tier desktop application architecture is implemented using the default Xomega solution template.


Presentation Tier

Presentation tier, which runs as a windows application on the user’s machine, follows the Model-View-View Model (MVVM) development paradigms where the Views that represent the visual forms and controls defined in XAML get bound to the corresponding View Models that store the actual Model data for the view, the state and meta-data for that model data, such as whether this data is editable or required or the list of values it can accept, and also provide any functions that validate the data on the client side or convert the data from one format to another, e.g. between the UI format and the internal values.

The actual presentation tier logic is encapsulated in the Code behind that runs when the user opens the corresponding WPF form. It instantiates a new View Model and then binds it to the current View using Xomega Framework, which provides two-way binding. This means that whenever the user changes anything on the screen it will be automatically propagated to the model and vice versa – when the application changes the view model, it will be automatically reflected in the view that is bound to it. The code behind reads any data from the middle tier into the View Model, and also handles UI events and updates the middle tier as a result.

The view models are implemented using Xomega Framework data object classes, which significantly simplifies both defining such data objects and its properties by providing all the plumbing for them such as validations, data conversion and formatting, lists of values and so forth, as well as binding view elements to those properties by implementing custom WPF bindings. These Xomega data objects may implement significant part of the UI behavior without any dependency on the WPF application, which means that you can reuse them in other types of clients such as Silverlight or ASP.NET by simply binding them to a different XAML or ASPX view respectively.

Moreover, Xomega Framework data objects for the application are mostly automatically generated from the Xomega service model operations described in this document with ability to extend them in separate classes, so that the data objects could be regenerated any time the service model changes. The standard search and details forms with code behind can also be initially generated from the Xomega service model, which can help boost the development productivity as the developers could start with an 80% or so complete working form and then update it and add the remaining 20% of functionality.

Middle Tier

The middle tier, which runs as a separate service on the same or a different machine, also has a layered structure with Business Logic Layer, Service Layer and the WCF Services, which are built on top of the service layer to expose these services to the clients using any supported WCF bindings. Typically internal clients would use a binary serialization format over the TCP or named pipes protocols for the best performance.

Service interfaces and data contracts (also known as Data Transfer Objects or DTO) in the Service Layer are generated automatically from the Xomega service model and decorated with WCF attributes to enable exposing service contracts as WCF Services. The service and endpoint configurations are also generated from the Xomega model.

The service implementation classes can also be initially generated from the Xomega service model, which speeds up the development process, but the developers need to implement any remaining service logic manually from that point on.

The service implementation classes use Entity Framework (EF) and LINQ to read the data from the database and persist the changes to the data. The Entity Data Model (EDM) is automatically generated from the Xomega object model and the classes for the corresponding entities are in turn generated from the EDM either by the built-in Visual Studio generator or by a T4 text template depending on whether you use the legacy Object Context or the latest DB context.

The generated entity classes can be extended to provide data validation, propagation and recalculation, which form the Business Logic Layer. This allows for all this entity functionality to be reused across multiple services and ensure data validity and integrity regardless of which service is updating this data. Business Logic Layer may also include a number of background tasks and services that run in the middle tier either on a scheduled basis or in response to external events.

Data Tier

The data tier (also called persistence tier) is implemented as a relational SQL server database that is hosted in its own database server. Most of the communication with the database from the middle tier can be handled automatically by the Entity Framework and LINQ queries. However, the middle tier may call the database directly to invoke a stored procedure or run a SQL query.

The SQL server database may also have its own internal logic implemented using T-SQL in the stored procedures or triggers that runs directly in the database.

Xomega.Net Blog Is Here!

Dear Xomega Friends,

We are launching a new Xomega blog. Here will be collected bits and pieces of information related to Xomega Framework, Xomega.NET, Model-Driven Development, code generation based on XML models and many other interesting things that make developer's life better.

You are very welcome to comment and participate in Xomega blog.

Stay with us and keep developing with pleasure!

– Your Xomega Team