What is Xomega Framework
For those of you who are not familiar with the Xomega Framework, it's a powerful framework for building web and desktop applications in .NET using MVVM pattern with clean layer separation. It allows you to easily write most of your presentation logic in a platform-independent way, which not only makes it extremely testable, but also allows you to use (and reuse) it with completely different UI layers, such as WPF and Blazor, or even with the older WebForms framework.
This way you can share your presentation logic between different UI technologies for web, desktop or even mobile applications, and then easily upgrade the UI layer if a new UI framework becomes available, thus future-proofing your application.
Let's take a look at some of the major parts of the Xomega Framework.
Data Objects
Data objects represent a part of the View Model in the MVVM pattern that contains observable data, which the View can be bound to. Data objects consist of special data properties, as well as other child data objects.
A special type of data object is a list object, where the data is stored in data rows, and the data properties represent columns in a table.
Data Properties
Unlike regular object properties, Xomega Framework data properties encapsulate not only the data value or multiple values, but also dynamic property metadata, such as editability, visibility, security access, whether or not the property is required, a list of possible values, modification state, as well as formatting, validation and conversion rules for the values.
The framework has an extensible hierarchy of data properties, which represents various data types with their specific conversion and formatting rules.
Here is what a data object and some of its properties will look like for the SalesOrderDetail table from the AdventureWorks database.
public class SalesOrderDetailObject : DataObject
{
    public EnumIntProperty ProductIdProperty { get; private set; }
    public SmallIntegerProperty OrderQtyProperty { get; private set; }
    public EnumIntProperty SpecialOfferIdProperty { get; private set; }
    public MoneyProperty UnitPriceProperty { get; private set; }
    public PercentFractionProperty UnitPriceDiscountProperty { get; private set; }
    public MoneyProperty LineTotalProperty { get; private set; }
}
Property Change Events
Similar to the other classic MVVM frameworks, Xomega data properties allow you to subscribe to property change events. However, unlike notifying about only the value changes, like the INotifyPropertyChange interface, data properties can also notify you about changes in their metadata as well, such as when the property becomes editable or required, or when the list of possible values for the property has changed.
A single property change event can be fired for any change in the data property’s value or any of its metadata, and also for any combination of such changes. So a single event can notify you about changes in all property attributes at once, which would allow listeners, such as property-bound controls, to update all of its state at the same time.
It also means that when listening for just property value changes, for example, you need to check if the property change includes the value change to avoid unnecessary execution of your callback.
Binding to UI controls
One of the primary usage of the property change events is support for binding properties to UI controls. This would automatically include binding control’s state to the property metadata, which makes this binding extremely simple and easy to use.
Once a UI control is bound to the property, you can set the property to be editable, required or invisible, and the changes will be reflected in the UI control automatically, without you having to bind those things separately.
Depending on the UI framework that you use, there could be two different ways to bind UI controls to data properties, as described below.
Control property bindings
With UI frameworks that allow you to associate additional attributes with the controls, such as attached properties in WPF, or custom attributes in WebForms controls, you can set the data property name on such controls, and have those controls bound to the data property using separate bindings.
This method allows you to bind any custom or third-party control that is derived from common UI controls to your data properties. Xomega Framework provides an extensible hierarchy of property bindings for both WPF and WebForms controls.
Here is an example of a WPF ComboBox control that is bound to the ProductId property using a static constant for the property name to provide compiler safety.
<ComboBox xmlns:xom="clr-namespace:Xomega.Framework;assembly=Xomega.Framework.Wpf"
          xom:Property.Label="{Binding ElementName=lblProductId}"
          xom:Property.Name="{x:Static o:SalesOrderDetailObject.ProductId}" />
The same control in WebForms would look as follows.
<asp:DropDownList LabelID="lblProductId" Property="<%# SalesOrderDetailObject.ProductId %>"
                  AutoPostBack="true" runat="server" />
Property bound controls
In other UI frameworks where using separate property bindings is not supported or problematic, you can develop and use custom UI controls that can be bound to Xomega data properties.
Xomega Framework provides a set of common Blazor components that you can bind directly to your data properties.
For example, a view with Blazor components that is bound directly to the properties of our SalesOrderDetailObject would look as follows.
<div>
    <XLabel Property="@VM?.MainObj?.ProductIdProperty" Text="Product:" />
    <XSelect Property="@VM?.MainObj?.ProductIdProperty" />
</div>
<div>
    <XLabel Property="@VM?.MainObj?.OrderQtyProperty" Text="Order Qty:" />
    <XInputText Property="@VM?.MainObj?.OrderQtyProperty" />
</div>
<div>
    <XLabel Property="@VM?.MainObj?.SpecialOfferIdProperty" Text="Special Offer:" />
    <XSelect Property="@VM?.MainObj?.SpecialOfferIdProperty" />
</div>
<div>
    <XLabel Property="@VM?.MainObj?.UnitPriceProperty" Text="Unit Price:" />
    <XDataLabel Property="@VM?.MainObj?.UnitPriceProperty" />
</div>
<div>
    <XLabel Property="@VM?.MainObj?.UnitPriceDiscountProperty" Text="Unit Price Discount:" />
    <XDataLabel Property="@VM?.MainObj?.UnitPriceDiscountProperty" />
</div>
<div>
    <XLabel Property="@VM?.MainObj?.LineTotalProperty" Text="Line Total:" />
    <XDataLabel Property="@VM?.MainObj?.LineTotalProperty" />
</div>
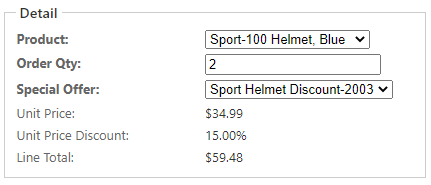
We used appropriate edit controls, such as dropdown lists and a textbox, for the first three fields that the user can enter. The last three fields are calculated based on the selected values of the first three fields, and cannot be entered directly by the user. So we used a display-only XDataLabel component for them, which is also bound to our properties.
Note also that the properties are automatically displayed using proper formatting, such as currency or percent.
Computed Properties
As you saw earlier, calculated display-only fields on a view are bound to data properties, where the value is not entered by the user, but is rather computed from the values of other data properties.
Specifically, the Unit Price is calculated based on the selected Product, and the Discount is calculated based on the selected Special Offer. Those selected values are represented by a Xomega Framework class Header, which stores an internal Id, the display text, and an arbitrary number of named attributes. The values of the unit price and discount are stored as special attributes of those selections, as you will see below.
The Line Total property is computed based on the specified quantity and the calculated unit price and discount. Let’s take a look at how to implement such computed properties using Xomega Framework.
Computed properties via events
The most straightforward way to implement a computed property is to add property change listeners to any other data properties that it depends upon, and then recalculate the computed value whenever the value of any of those data properties changes.
To implement the Unit Price we can override the OnInitialized method on our data object, and add a listener to the ProductIdProperty, which will update the UnitPriceProperty as follows.
protected override void OnInitialized()
{
    base.OnInitialized();

    ProductIdProperty.Change += (sender, e) =>
    {
        if (e.Change.IncludesValue())
        {
            UnitPriceProperty.SetValue(ProductIdProperty.IsNull() ? null :
                                       ProductIdProperty.Value["list price"]);
        }
    };
}
Note how we check if the change includes value, since data property changes may be fired for other metadata changes.
To implement the computed property for the Unit Price Discount, we will add a similar listener to the SpecialOfferIdProperty, and will set the value of the discount from an attribute of the selected special offer as follows.
SpecialOfferIdProperty.Change += (sender, e) =>
{
	if (e.Change.IncludesValue())
	{
		UnitPriceDiscountProperty.SetValue(SpecialOfferIdProperty.IsNull() ? null :
                                          SpecialOfferIdProperty.Value["discount"]);

		UnitPriceDiscountProperty.Visible = !UnitPriceDiscountProperty.IsNull() &&
                                                     UnitPriceDiscountProperty.Value > 0;
	}
};
In the same listener we update the visibility of the discount property in order to hide the field if there is no discount.
Finally, to implement the computed Line Total property, we will first add two helper functions: GetLineTotal that calculates the line total for supplied nullable values, and the UpdateLineTotal property change listener, which uses that function to set the value of the LineTotalPoperty from the values of the other properties, as follows.
private decimal GetLineTotal(decimal? price, decimal? discount, int? qty) =>
    (price ?? 0) * (1 - (discount ?? 0)) * (qty ?? 0);

private void UpdateLineTotal(object sender, PropertyChangeEventArgs e)
{
    if (e.Change.IncludesValue())
    {
        LineTotalProperty.SetValue(GetLineTotal(UnitPriceProperty.Value,
            UnitPriceDiscountProperty.Value, OrderQtyProperty.Value));
    }
}
Now we just need to update the OnInitialzied method, and add the UpdateLineTotal as a listener to all the properties, whose values it depends on, as shown below.
    ProductIdProperty.Change += UpdateLineTotal;
    SpecialOfferIdProperty.Change += UpdateLineTotal;
    OrderQtyProperty.Change += UpdateLineTotal;
Remember that all this presentation logic is contained entirely in the data object, and does not depend on the actual UI layer, which means that you can reuse it with any UI framework.
Computed properties via expressions
While implementing computed properties via events, as described earlier, could be the most straightforward way, it’s not the simplest or the most natural one. Adding all these property listeners that recalculate values of other properties can get very tedious. And even after you add them all, you will have a hard time understanding how each computed property is calculated. You also need to be very careful when changing any of the calculations to make sure you add new listeners for any additional properties that computed value uses, and remove the listeners for the properties that it no longer depends on.
A more natural way to define computed properties is to just express the formula for calculating the value, and let the system update the computed value whenever the other properties change. This would be similar to defining such formulas for calculated cells in an Excel spreadsheet.
In order to support this, Xomega Framework added a new feature, where you can define an expression that takes any number of data objects or data properties and returns the computed value as an object. Then you call the SetComputedValue method on the target computed property, and pass that expression to it along with references to the actual objects for the expression’s arguments.
With this approach, setting up the computed UnitPriceProperty with an expression that takes the current data object will be very easy and succinct, as shown below.
protected override void OnInitialized()
{
    base.OnInitialized();

    // computed property using the entire object
    Expression<Func<SalesOrderDetailObject, object>> xPrice = sod =>
        sod.ProductIdProperty.IsNull(null) ? null : sod.ProductIdProperty.Value["list price"];
    UnitPriceProperty.SetComputedValue(xPrice, this);
}
You can make it even more succinct and easier to read, if you make the expression based on specific data properties rather than a data object, as shown in the following snippet, which sets up the price discount based on the special offer.
    // computed property using individual property
    Expression<Func<EnumProperty, object>> xDiscount = spOf =>
        spOf.IsNull(null) ? null : spOf.Value["discount"];
    UnitPriceDiscountProperty.SetComputedValue(xDiscount, SpecialOfferIdProperty);
If you want to set up computed metadata, such as visibility or editability, based on the values or metadata of other properties, then you can use a similar expression that returns a bool. For example, the following code shows how to make the price discount visible only if its own value (the discount) is greater than zero.
    // computed visible attribute based on discount value
    Expression<Func<PercentFractionProperty, bool>> xVisible = dp =>
        !dp.IsNull(null) && dp.Value > 0;
    UnitPriceDiscountProperty.SetComputedVisible(xVisible, UnitPriceDiscountProperty);
Finally, to configure more complex computed properties, such as our LineTotalProperty, we can make the expression use our helper function GetLineTotal, and just pass it the values of individual data properties, as follows.
    // computed total using a helper function
    Expression<Func<SalesOrderDetailObject, decimal>> xLineTotal = sod =>
        GetLineTotal(sod.UnitPriceProperty.Value,
                     sod.UnitPriceDiscountProperty.Value,
                     sod.OrderQtyProperty.Value);
    LineTotalProperty.SetComputedValue(xLineTotal, this);
Using helper functions like this will allow you to keep the expressions easy to read and implement, since you will no longer be limited by the expression syntax in the helper functions, and can use the full gamut of C# features there.
Conclusion
In this article you have learned the basic principles of Xomega Framework that uses observable data properties and data objects to implement reusable presentation logic of your application independent of the UI framework being used.
You saw how the property change events can be used both for binding data properties to UI controls, and to implement computed properties.
And lastly, you learned how the new Xomega Framework features allow you to easily set up computed properties using clear and concise expressions for the calculated value, without the hassle of managing any property listeners.
Please feel free to try out these new cool features of the Xomega Framework, and let us know how you like them.
